Installing a Malden Metals Steel Privacy Fence
Tools
- Rubber Mallet
- Cordless Impact Drill
- String line & Marker Pegs or Spray Paint
- Magnetic level
- Post hole digger
- Tape measure
- Spade Shovel
- wheelbarrow
- Magnetic Hex Driver
- Quick set concrete mix
- Cordless zip disk/Nibbler or Metal snips
Safety Tools
- Steel toe boots
- Work gloves
- Safety glasses
- Earmuffs or earplugs
1. Getting Started
Here are some tips before you get started on your fence installation project. Read though the entire installation instructions before you begin. Prevent the fencing material from getting scratched by keeping it in the packaging until needed and set it down on level and smooth surface. Some cutting of the fence components will probably be required. Use a zip disk/nibbler or metal snips. Call all your local utilities to mark any underground lines. Do not start to pound and posts or dig holes until you know where any buried lines are. Find out where your property lines are.
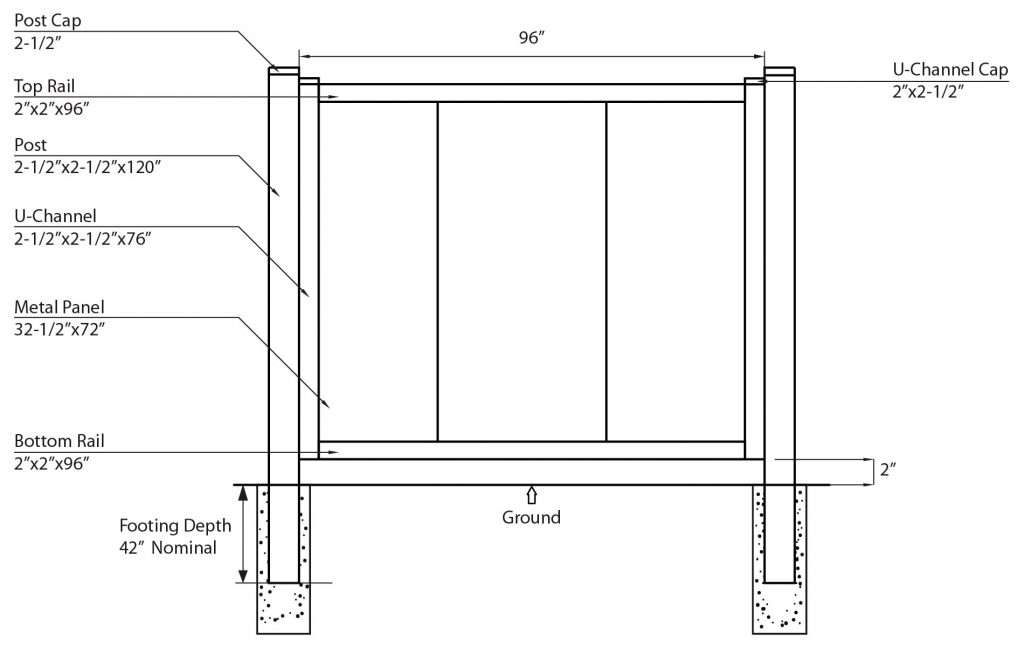
2. Learning Fence Components

3. Digging your holes
Make sure all underground lines have been marked before digging begins. The ideal spacing, center to center of posts is, 96 ¼” for an 8′ section. If the fence is installed on a slope the distance will have to be shorter dependent on the slope. A rail can also be used as a spacer between the posts. Start by laying out your fence posts to determine the best fit for the last couple sections in your run. You do not want a 2’ long section at the end. Start by pounding a marker peg on each end of the fence length. Place a string line around the two pegs to ensure a straight line. Measure and make a mark with a peg or spray paint for every post. The distance from center of post to center of post is 98 ¾”. Dig each post hole 48” down and fill the bottom 6” of your hole with concrete. Your post should sit 6” off the bottom of the hole. Use a magnetic level and set your posts so they are plumb. Back fill the hole with concrete until it is 2” below grade. This will allow for some movement of the concrete before it is above grade. Do this for each post and let dry.
4. Securing the U-channel
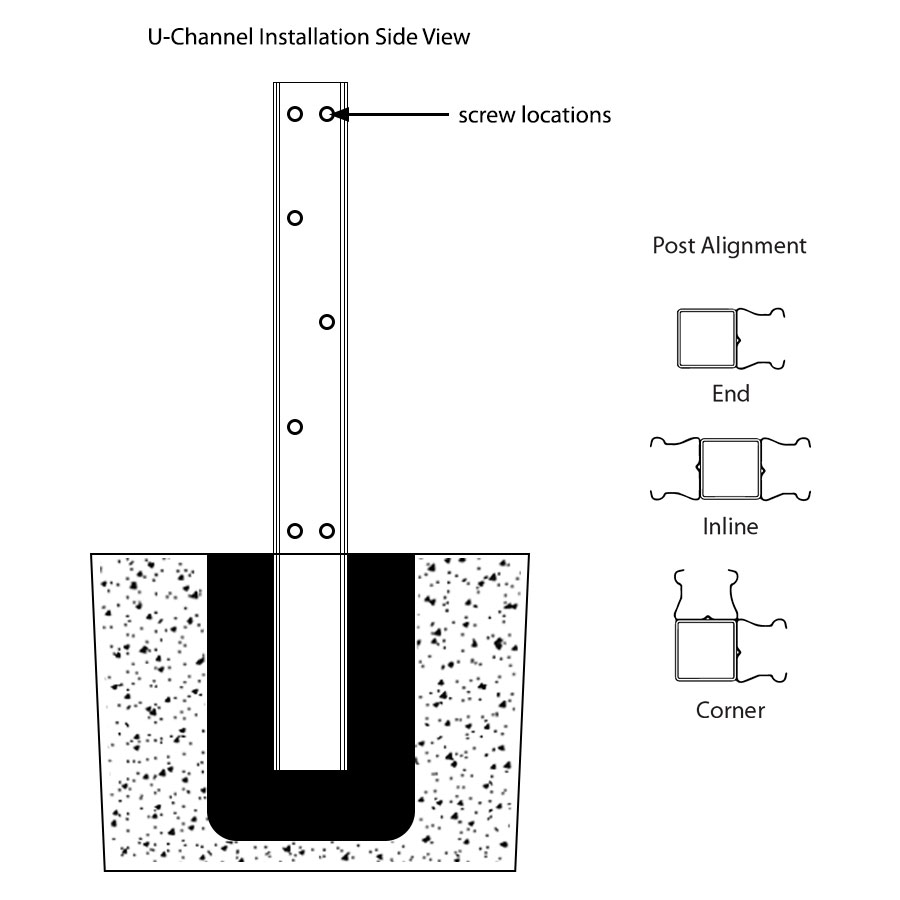
Once your posts are set you will need to fasten your u-channel to them. You will use self-tapping hex head screws. The u-channel will need to have two screws 2” below the top of the channel and 2” above the bottom of the channel. There will be 3 more screws spread out accordingly. See Picture below:

5. Installing Fence Panels
To start the installation of your fence panels, insert the bottom rail into u-channel on both sides at desired height off the grade and use your level on the rail. Secure loosely with self-tapping hex head screws. These will need to be backed out when the sheets are installed. Next slide your sheets down the u-channel and into the bottom rail. Tap with your rubber mallet if needed. Once the sheets are set in place, tighten the screws on the bottom rails. The screws should go through the u-channel, bottom rail and into the sheet. There should be two screws on either side of the bottom rail. Complete this step on both sides of the bottom rail. Next you will need to slide your top rail into the u-channel and onto the sheets. Next, your top rails will need to be installed. Drill your self-tapping screws through the u-channel, top rail and into the sheet. The process is completed by drilling the u-channel cap onto the u-channel with self-tapping screws. Touch up any spots that are scuffed or cut with a touch up pen.
